
Step 1:
Create a New Vendor


1) Click on Vendors
2) Press Create New
Step 2:
Enter Carrier Info

-
Enter Carrier Name
-
Enter Carrier Address
-
Select Vendor Type
-
Carrier if it is the company
-
Wholesaler if it is the MGA (excess market)
-
-
Company type P & C
-
Alway select the states of NJ & NY
-
SAVE
Step 3:
Enter Commission

-
Click “New”
-
Select product
-
Select correct state
-
Enter new business %, commission renewal rate
-
Effective from renewal date until 2099 as commissions change
-
THIS IS IMPORTANT AS COMMISSIONS UNDER BILLING WILL NOT CALCULATE IF THIS IS NOT COMPLETED
-
This step will likely already be completed
-
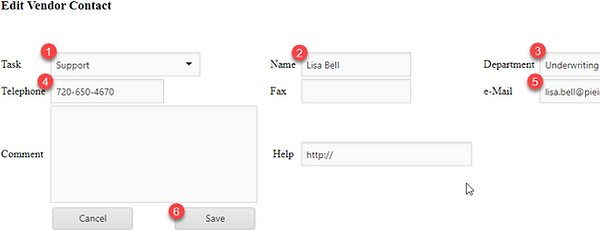
Creating a Contact

Under the Vendor, click “Create New Contact”

-
Select a task
-
Enter the person’s name
-
Enter the department’s name
-
Enter the telephone number of the person
-
Enter the email address
-
Click “Save” and the contact should appear as a contact
Creating a Form
-
Click “Create New Form”
-
Forms can be appetite forms, step by step guides, marketing materials of the carrier, etc.
-

-
Enter a task
-
Select Document Type (Always Form)
-
You can enter a comment describing what the form is
-
Click “Browse” and select the form that you want to upload
-
Click “Save”
Entering Help and Payment Links

-
To find the appropriate link: Go to HELP sheet. Then copy the carrier help link from 3)Quote column and paste it under “Help Carrier URL”
-
Go to Carrier Limits Help, copy the link of the carrier and paste it under “Help Limits URL”
-
If the payment options are not included in the help, find out how the carrier accepts payments. Then add it on the slide and copy the link under “Payments URL”
-
Lastly, enter the billing department number
-
If you don’t know it, you can google it or get it from the policy

The purpose of adding help links is for policy delivery
When we deliver the policy to the client they can see how they can make a payment and where to call for billing issues
Steps on how to add the link are followed on the next slide
YOU TRY!
-
FIND the “TestVendor” to familiarize yourself with this data entry on our portal
-
UPLOAD a document (name it after your name)
-
Create a contact (your name and your info)
-
Email your trainer the link of your work